.jpg?width=1200)
Australia
HMAS Pioneer
Light cruiser · New South Wales
Battlecruiser

HMAS Australia was one of three Indefatigable-class battlecruisers built for the defence of the British Empire. Ordered by the Australian government in 1909, she was launched in 1911, and commissioned as flagship of the fledgling Royal Australian Navy (RAN) in 1913. Australia was the only capital ship to serve in the RAN. At the start of World War I, Australia was tasked with finding and destroying the German East Asia Squadron, which was prompted to withdraw from the Pacific by the battlecruiser's presence. Repeated diversions to support the capture of German colonies in New Guinea and Samoa, as well as an overcautious Admiralty, prevented the battlecruiser from engaging the German squadron before the squadron's destruction. Australia was then assigned to North Sea operations, which consisted primarily of patrols and exercises, until the end of the war. During this time, Australia was involved in early attempts at naval aviation, and 11 of her personnel participated in the Zeebrugge Raid. The battlecruiser was not at the Battle of Jutland, as she was undergoing repairs following a collision with sister ship HMS New Zealand. Australia fired in anger twice: at a German merchant vessel...
The Indefatigable class of battlecruisers were based heavily on the preceding Invincible class. The main difference was that the Indefatigable ' s design was enlarged to give the ships' two wing turrets a wider arc of fire. As a result, the Indefatigable class was not a significant improvement on the Invincible design; the ships were smaller and not as well protected as the contemporary German battlecruiser SMS Von der Tann and subsequent German designs. While Von der Tann ' s characteristics were not known when the lead ship of the class, HMS Indefatigable, was laid down in February 1909, the Royal Navy obtained accurate information on the German ship before work began on Australia and her sister ship HMS New Zealand.
Australia had an overall length of 590 feet (179.8 m), a beam of 80 feet (24.4 m), and a maximum draught of 30 feet 4 inches (9.2 m). The ship displaced 18,500 long tons (18,797 t) at load and 22,130 long tons (22,485 t) at deep load. She had a crew of 818 officers and ratings in 1913.
The ship was powered by two Parsons ' sets of direct-drive steam turbines, each driving two propeller shafts, using steam provided by 31 coal-burning Babcock & Wilcox boilers. The turbines were rated at 44,000 shaft horsepower (33,000 kW ) and were intended to give the ship a maximum speed of 25 knots (46 km/h; 29 mph). During trials in 1913, Australia 's turbines provided 55,000 shp (41,013 kW), allowing her to reach 26.9 knots (49.8 km/h; 31.0 mph). Australia carried enough coal and fuel oil to give her a range of 6,690 nautical miles (12,390 km; 7,700 mi) at a cruising speed of 10 knots (19 km/h; 12 mph).
Australia carried eight BL 12-inch (305 mm) Mark X guns in four BVIII* twin turrets, the largest guns fitted to any Australian warship. Two turrets were mounted fore and aft on the centreline, identified as 'A' and 'X' respectively. The other two were wing turrets mounted amidships and staggered diagonally: 'P' was forward and to port of the centre funnel, while 'Q' was situated starboard and aft. Each wing turret had some limited ability to fire to the opposite side. Her secondary armament consisted of sixteen BL 4-inch (102 mm) Mark VII guns positioned in the superstructure. She mounted two submerged tubes for 18-inch torpedoes, one on each side aft of 'X' barbette, and 12 torpedoes were carried.
The Indefatigable s were protected by a waterline 4–6-inch (102–152 mm) armoured belt that extended between and covered the end barbettes. Their armoured deck ranged in thickness between 1.5 and 2.5 inches (38 and 64 mm) with the thickest portions protecting the steering gear in the stern. The main battery turret faces were 7 inches (178 mm) thick, and the turrets were supported by barbettes of the same thickness.
Australia ' s 'A' turret was fitted with a 9-foot (2.7 m) rangefinder at the rear of the turret roof. It was also equipped to control the entire main armament, in case normal fire control positions were knocked out or rendered inoperable.
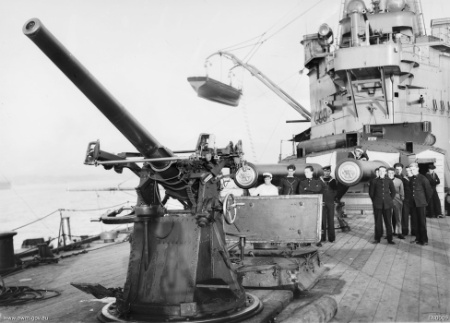
Australia received a single QF 3-inch (76 mm) 20 cwt anti-aircraft (AA) gun on a high-angle Mark II mount that was added in March 1915. This had a maximum depression of 10° and a maximum elevation of 90°. It fired a 12.5-pound (5.7 kg) shell at a muzzle velocity of 2,500 ft/s (760 m/s) at a rate of fire of 12–14 rounds per minute. It had a maximum effective ceiling of 23,500 ft (7,200 m). It was provided with 500 rounds. The 4-inch guns were enclosed in casemates and given blast shields during a refit in November 1915 to better protect the gun crews from weather and enemy action, and two aft guns were removed at the same time. An additional 4-inch gun was fitted during 1917 as an AA gun. It was mounted on a Mark II high-angle mounting with a maximum elevation of 60°. It had a reduced propellant charge with a muzzle velocity of only 2,864 ft/s (873 m/s); 100 rounds were carried for it.
Australia received a fire-control director sometime between mid-1915 and May 1916; this centralised fire control under the director officer, who now fired the guns. The turret crewmen merely had to follow pointers transmitted from the director to align their guns on the target. This greatly increased accuracy, as it was easier to spot the fall of shells and eliminated the problem of the ship's roll dispersing the shells when each turret fired independently. Australia was also fitted with an additional inch of armour around the midships turrets following the Battle of Jutland.
By 1918, Australia carried a Sopwith Pup and a Sopwith 1½ Strutter on platforms fitted to the top of 'P' and 'Q' turrets. The first flying off by a 1½ Strutter was from Australia ' s 'Q' turret on 4 April 1918. Each platform had a canvas hangar to protect the aircraft during inclement weather. At the end of World War I, Australia was described as "the least obsolescent of her class".
After the war, both anti-aircraft guns were replaced by a pair of QF 4-inch Mark V guns on manually operated high-angle mounts in January 1920. Their elevation limits were −5° to 80°. The guns fired a 31-pound (14 kg) shell at a muzzle velocity of 2,387 ft/s (728 m/s) at a rate of fire of 10–15 rounds per minute. They had a maximum effective ceiling of 28,750 ft (8,760 m).
Australia received a single QF 3-inch (76 mm) 20 cwt anti-aircraft (AA) gun on a high-angle Mark II mount that was added in March 1915. This had a maximum depression of 10° and a maximum elevation of 90°. It fired a 12.5-pound (5.7 kg) shell at a muzzle velocity of 2,500 ft/s (760 m/s) at a rate of fire of 12–14 rounds per minute. It had a maximum effective ceiling of 23,500 ft (7,200 m). It was provided with 500 rounds. The 4-inch guns were enclosed in casemates and given blast shields during a refit in November 1915 to better protect the gun crews from weather and enemy action, and two aft guns were removed at the same time. An additional 4-inch gun was fitted during 1917 as an AA gun. It was mounted on a Mark II high-angle mounting with a maximum elevation of 60°. It had a reduced propellant charge with a muzzle velocity of only 2,864 ft/s (873 m/s); 100 rounds were carried for it.
Australia received a fire-control director sometime between mid-1915 and May 1916; this centralised fire control under the director officer, who now fired the guns. The turret crewmen merely had to follow pointers transmitted from the director to align their guns on the target. This greatly increased accuracy, as it was easier to spot the fall of shells and eliminated the problem of the ship's roll dispersing the shells when each turret fired independently. Australia was also fitted with an additional inch of armour around the midships turrets following the Battle of Jutland.
By 1918, Australia carried a Sopwith Pup and a Sopwith 1½ Strutter on platforms fitted to the top of 'P' and 'Q' turrets. The first flying off by a 1½ Strutter was from Australia ' s 'Q' turret on 4 April 1918. Each platform had a canvas hangar to protect the aircraft during inclement weather. At the end of World War I, Australia was described as "the least obsolescent of her class".
After the war, both anti-aircraft guns were replaced by a pair of QF 4-inch Mark V guns on manually operated high-angle mounts in January 1920. Their elevation limits were −5° to 80°. The guns fired a 31-pound (14 kg) shell at a muzzle velocity of 2,387 ft/s (728 m/s) at a rate of fire of 10–15 rounds per minute. They had a maximum effective ceiling of 28,750 ft (8,760 m).

At the start of the 20th century, the British Admiralty maintained that naval defence of the British Empire, including the Dominions, should be unified under the Royal Navy. Attitudes on this matter softened during the first decade, and at the 1909 Imperial Conference, the Admiralty proposed the creation of 'Fleet Units': forces consisting of a battlecruiser, three light cruisers, six destroyers, and three submarines. Although some were to be operated by the Royal Navy at distant bases, particularly in the Far East, the Dominions were encouraged to purchase fleet units to serve as the core of new national navies: Australia and Canada were both encouraged to do so at earliest opportunity, New Zealand was asked to partially subsidise a fleet unit for the China Station, and there were plans for South Africa to fund one at a future point.
Each fleet unit was designed as a "navy in miniature", and would operate under the control of the purchasing Dominion during peacetime. In the event of widespread conflict, the fleet units would come under Admiralty control, and would be merged to form larger fleets for regional defence. Australia was the only Dominion to purchase a full fleet unit, and while the New Zealand-funded battlecruiser was donated to the Royal Navy outright, no other nation purchased ships under the fleet unit plan.
On 9 December 1909, a cable was sent by Governor-General Lord Dudley to the Secretary of State for the Colonies, The Earl of Crewe, requesting that construction of three Town class cruisers and an Indefatigable -class battlecruiser start at earliest opportunity. It is unclear why this design was selected, given that it was known to be inferior to the battlecruisers entering service with the German Imperial Navy ( Kaiserliche Marine ). Historian John Roberts has suggested that the request may have been attributable to the Royal Navy's practice of using small battleships and large cruisers as flagships of stations far from Britain, or it might have reflected the preferences of the First Sea Lord and Admiral of the Fleet John Fisher, preferences not widely shared.
The Australian Government decided on the name Australia, as this would avoid claims of favouritism or association with a particular state. The ship's badge depicted the Federation Star overlaid by a naval crown, and her motto was "Endeavour", reflecting both an idealisation of Australians' national spirit and attitude, and a connection to James Cook and HM Bark Endeavour. On 6 May 1910, George Reid, Australia's high commissioner to the United Kingdom, sent a telegram cable to the Australian Government suggesting that the ship be named after the newly crowned King George V, but this was rebuffed.
Bids for construction were forwarded to the Australian Government by Reid on 7 March 1910, and Prime Minister Alfred Deakin approved the submission by John Brown & Company to construct the hull and machinery, with separate contracts awarded to Armstrong and Vickers for the battlecruiser's armament. The total cost of construction was set at £2 million. Contracts were signed between the Admiralty and the builders to avoid the problems of distant supervision by the Australian Government, and a close watch on proceedings was maintained by Reid and Captain Francis Haworth-Booth, the Australian Naval Representative in London.
Closest places in our Australia guide.
More places to explore in Australia.

.jpg?width=1200)


.jpg?width=1200)
.jpg?width=1200)
.jpg?width=1200)


